
The Plesk control panel is a beautiful, intuitive and easy to use GUI. It will enable you to control and master every aspect of your web hosting here at HostNexus. From here you can manage your WordPress instances, email and spam filters, files, statistics, SSL, backups and so much more. Quite literally this control panel can do everything. This is a brief overview to familiarize yourselves with some of the features and functions. Some sections will require their own posts so in the interest of brevity I’ll link to those.
The image featured above is the standard Plesk Customer level control panel that all Managed WordPress Hosting clients have. Most of our older clients on legacy plans are on the Reseller level that looks a little different.
Managing Multiple Domains
 When you first login to the Plesk control panel you land on the main Websites & Domains page. If you have multiple domains, by default the page will show all domains. Just scroll down and you’ll see that each domain has a main control panel like the above. Alternatively you can toggle the Subscription drop-down menu on the top right of Plesk. In the Plesk control panel a Subscription is a totally separate domain with its own resource pool allocation. This is compared to traditional Addon Domains that share a document root with a primary domain. Another drawback to Addon Domains is that they also share the resource pool (memory, CPU etc) of the primary domain. At HN we discourage the use of Addon domains due to these security and performance drawbacks. However, if a client really wants to use them they can contact us and we can activate them.
Add Subdomains In The Plesk Control
At the top of the page you’ll see two buttons: Add Subdomain and Add Domain Alias. At HostNexus we don’t limit the amount of subdomains you can create. Please note, however, that when creating a staging environment for WordPress Plesk will create the subdomain by default. You can also elect to clone WordPress to an existing subdomain but more about that in the WordPress Toolkit section. When you add a subdomain it automatically fills out the Document Root.

Upon creation your subdomain will now have a control panel listed in Plesk when you scroll down. Your subdomain’s files live in the main root of its domain as you can see here:

For reference, your website’s main files always live in httpdocs. Subdomains are created alongside it.
Add Domain Alias
In the Plesk control panel you can also add as many Domain Aliases as you need. The options for your Domain Alias cover every scenario:
- Synchronize DNS zone with the primary domain– Your domain will share the primary’s DNS.
- Mail service – Mail sent to the alias will be routed to he primary.
- Web service – Alias will work over HTTP/HTTPS.
- Redirect with the HTTP 301 code – Choose to redirect Alias to the main domain.

Hosting Settings
The Hosting Settings page can be accessed from 2 places in the Plesk control panel. At the top you’ll see it under your Document Root (httpdocs by default). In that section you’ll also see your IP, system username, website preview link.

This Hosting Settings page is divided into 3 sections. We’ll call the top section Basic Settings, then there are the Security Settings and finally Web scripting and Statistics.
Basic Settings

- Domain name – Your registered domain name that you will use for this website. This can be changed by the client if the need arises.
- Hosting type – By default, all websites are set to Website which means the website is set in the file system. This can be changed to Forwarding, or No hosting.
- Website status – Default is Active. Click [Change] to disable or suspend the website. Please note the subtle differences between Disabled and Suspended.

- Document root – Set to httpdocs. All web accessible files will be uploaded to httpdocs.
- Preferred domain – Set whether you want your domain to be domain.com or www.domain.com.
Security Settings

- SSL/TLS support – By default all domains are setup with this deactivated to help with website previewing.
- Permanent SEO-safe 301 redirect from HTTP to HTTPS – All traffic will be automatically redirected from HTTP to HTTPS version of the site using the 301 HTTP status code (permanent redirect). This is also not active by default. One active installing a valid SSL certificate should be a priority when moving a new website to HostNexus.
- Certificate – The SSL certificate you will be using for your domain. If you install a certificate manually the final step is to assign the certificate to your domain here. Certificates installed via Let’s Encrypt or our AutoInstallSSL feature will be automatically assigned here.
Web Scripting and Statistics

- Scripting languages – As well as PHP we also support SSI, CGI and FastCGI. For PHP, you can select the custom PHP version and handler type. On Managed WordPress Hosting we support PHP 5.6, 7.0, 7.1 and 7.2. By default sites are setup with PHP 7 ran as FPM under Apache (Nginx reverse proxy). Please note that PHP 5.6 and 7.0 will be removed in January 2019. We will provide assistance to anyone needing help in migrating to PHP 7.1 or 7.2. More PHP settings are available in the PHP Settings section.
- Web statistics – Select or disable the Awstats web statistics software for viewing graphical reports and charts on website visitors. If you want to password protect the directory location of your web statistics files select the “Protect access to your web statistics with your FTP user and password” option. Your FTP username and password will be used. If you don’t check this option your web stats directory will be publicly viewable.
- Custom error documents– Check to use your own custom error documents.
- Easily change domain name
- Set preferred domain (with or without www).
- Enable 301 redirect to HTTPS.
- Assign domain correct SSL certificate.
Website Preview In The Plesk Control Panel

You can easily preview and test your website before you push it live. The Preview link is at the top of the main panel, under your site’s IP. One caveat to using the Preview feature though. Under Hosting Settings the “Permanent SEO-safe 301 redirect from HTTP to HTTPS” option must be disabled.

This is classified as a bug by Plesk and is expected to be fixed in a future Plesk control panel version. To enable testing via the Website Preview we set up all sites with SSL and the 301 redirect disabled. Also, please the admin Auto-Login feature in the WordPress Toolkit will not work when your domain is resolving to another server. To login to your WordPress dashboard simply go to your Preview URL and append /wp-login.php. This will bring up your WordPress login page. If you have yet to import a database you’ll be using the username and password set up by Plesk when your account was created. Click into the WordPress Toolkit and in General Info next to Administrator click on [Setup].

This will bring up your access credentials. Click on the “eye” icon to view your password. Copy and paste into your login form and you should be good to go.

Website Preview Troubleshooting Tips
- If your Preview is redirecting you to your primary domain please ensure “Permanent SEO-safe 301 redirect from HTTP to HTTPS” is disabled in Hosting Settings.
- If, when appending /wp-login.php to your Preview URL, you are redirected to your domain’s login URL please make sure SSL is fully disabled in Hosting Settings (uncheck the SSL box).
- Some caching and optimizing plugins that aggregate CSS and JS will add your domain’s base URL instead of a relative path. This can cause display issues depending on how your old web serve is setup (Access-Control-Allow-Origin headers restricting content for example). Try disabling these plugins while in your testing phase and enabling them when your domain is live on our server.
- If you setup a WordPress site with SSL enabled your siteurl and home URLs will be set to https in your WordPress database. In order for the Website Preview to work and login to the WP dashboard on the preview URL you will need to edit these variables to http via phpMyAdmin.

File Manager
The Plesk control panel comes with and excellent file manager. It can be accessed from 3 places in the main Websites & Domains dashboard.

The interface is extremely intuitive but I will run through some of the functions quickly.

Your document root is httpdocs. All your website’s file will go here (unless they are in subdomains). Left click any file or directory and you’ll see a variety of options to edit the file, rename, change permissions and open in a browser. These same options are available in the drop-down on the far right.

The file uploader supports multiple file uploads. Just press CTRL and select all files to upload.

Easily create new files and directories.

Select a file or directory and click Copy to copy to a new destination. Just drill down through the file structure to your desired new location. Check a box to overwrite existing files.


The Move function works exactly the same as Copy. Just select the new location and whether to replace the existing file(s).

The file manager also allows you to extract (unzip) .zip and .rar archives. Just select the archive and Extract Files.


Another handy tool is the ability to archive files and directories for easy download. Just select the desired files and directories and Add to Archive.

Managing Mail In The Plesk Control Panel
Your mail accounts can be accessed from 3 locations in the Websites & Domains dashboard.

In Plesk you can easily add mail accounts, set forwarders, mail groups, auto-responders and email aliases. Our default mailbox size is 1gb and this is a hard limit on Managed WordPress Hosting where server performance is our top priority.
Databases
Your databases are also accessed from 3 locations in Websites & Domains.

In the Database Manager you can do many things that would normally require phpMyAdmin access.

- phpMyAdmin – The default database management tool.
- Connection Info – Lists database server, username and password.
- Copy – Easily copy your database tables to a new database.
- Export Dump – Export your database right from Plesk.
- Import Dump – Import a .sql file from your computer or server location.
- Check and Repair – Check database integrity and repair crashed tables.
Click on User Management to reset a user’s password or set up a new database user. Click Add Database to create a new database, user and assign user privileges.
WordPress Toolkit
The Plesk WordPress Toolkit is an all-encompassing WordPress management suite. It’s key functions are right there in your Websites & Domains dashboard.

From here you can access your WordPress dashboard without logging in, secure your WordPress instance, manage plugins and themes, clone your instance to a staging site and sync your staging site back to your main site. These options and a whole host of others are available in the full toolkit. Access it by clicking on your WordPress instance’s name (default is MY CMS). You can also access from the last item on the left menu or by the WordPress item on the right-side menu.

This incredible piece of software takes a lot of the management headaches away. It is so feature rich that it deserves its own post. Please read our Plesk WordPress Toolkit guide here and learn how powerful this management suite really is!
 Web Hosting Access
 Web Hosting Access
That brings us to the first item on the dashboard’s main panel. In Web Hosting Access you can edit your FTP username and password. Also please note that only secure FTP connections are allowed on our servers. This can be called FTPS or FTPES in your FTP program. In FileZilla it is TLS Explicit. For more info on Secure FTP connections please our post on Enforcing Secure FTP Sessions.
FTP Access
 FTP Access
In FTP Access you can also edit your main FTP user’s username and password. But if you need to add additional FTP users this is where you do it. You can also restrict any FTP user you add to a specific directory. Just click on the folder icon and drill down to the specified directory. This is handy if you have developers that need to access staging sites or upload data into a particular directory.
Git
 Git
GitPlesk has full Git integration. You can choose a remote Git repository like GitHub or BitBucket or a local repository on your workstation. You can set the deployment mode to Automatic or Manual. In Automatic mode files will be deployed to the production site as soon as they are pushed to the Plesk repository. In Manual mode files have to be manually deployed to the production site after they are pushed to the Plesk repository. You can also set the deployment directory to a su-directory of httpdocs or a staging site.

Let’s Encrypt Integrated With The Plesk Control Panel
 Let’s Encrypt Integrated With The Plesk Control Panel
Secure your domain for free with Let’s Encrypt. Installing your Let’s Encrypt SSL certificate is as simple as setting your email address and clicking Install. Be sure to set a valid email so you can receive important notifications and warnings from the server. For example, if your Let’s Encrypt fails to renew for some reason you want to know straight away. You can also opt to secure Webmail on your domain as well as your domain’s www version. Let’s Encrypt renews every 3 months and the renewal takes place 30 days before its expiration. So in the case of renewal failure you have plenty of time to fix.
Node.js
 Node.js
For the more advanced developers out there Plesk ships with full Node.js support. Versions 6, 7, 8 and 9 are supported. Simply select your document root, application root, application URL and application startup file. Custom environment variables are also supported.
PHP Settings
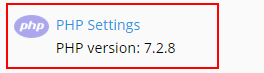 PHP Settings
As mentioned earlier you can set your PHP version and handler in Hosting Settings. In PHP Settings you can adjust common settings like open_basedir, error_reporting and display_errors. As of summer 2018 all sites are deployed with PHP 7.2.8 ran as FPM under Apache. In this configuration Nginx is ran as a reverse proxy. You can elect to run PHP 7 as FPM under Nginx:

Please note that .htaccess rules do not work on pure Nginx. We choose to set sites as FPM-Apache as most people are comfortable with .htaccess rules. Running pure Nginx may give you a slight performance edge but you also need to know how to write Nginx directives for things that .htaccess usually handles.
Performance Settings
These are our default settings for PHP:
- memory_limit: 256mb
- max_execution_time: 180 seconds
- max_input_time: 180 seconds
- post_max_size: 128mb
- upload_max_filesize: 96mb
- opcache.enable: On
These default values are set to work well with your domain’s resource pool allocation (namely 3gb memory total and 3 CPUs). These limits can also be adjusted by request. We don’t recommend you exceed the current memory_limit as a poorly coded plugin that allocates max memory could bring your site down.
PHP-FPM Settings
The last section covers your domain’s PHP-FPM settings.
- pm.max_children: 25
- pm.max_requests: 200
- pm: onDemand
You can learn more about these settings here.
These values are set for maximum performance based on your domain’s resource allocation. The value max_children refers to the amount of PHP processes that a script can spawn. The max value is based on the memory usage of an average WordPress PHP process and the amount of memory your domain will have available for Nginx. During rigorous loading testing the default values can handle thousands of simultaneous connections.
Apache & Nginx Settings
 Apache & Nginx Settings
Enable/disable Nginx caching, set cache size, cookie management, disable cache locations. For more information on getting your site to cache correctly in Nginx please read our Nginx Caching guide.
Applications
 Applications
The Applications page can be accessed from the main Websites & Domains panel as well from the left-side menu. Unlike other WordPress hosts we allow clients to install a variety of applications (Joomla, Drupal, phpBB etc). Clients looking for a solid hosts for such apps can take advantage of our optimized stack for WordPress and enjoy an enhanced environment to run these apps. In fact we don’t mind if you remove WordPress entirely and use your account to run one of these apps instead. Applications are all one-click and there are currently over 250 apps in the catalog.

We are primarily a Managed WordPress Host with a focus on Performance and Security. A big problem with application auto-installers is that clients install an app and then forget about ever updating it. This allows hackers to easily hack a website. Therefore we have a strict update policy on all apps installed from our Application Vault. If an update becomes available your installation will automatically be updated.
We also only allow applications to be installed from our Application Vault. If an application is found that was not installed from the Application Vault it will be removed to ensure the safety and security of the server. This does not apply to Managed VPSes where clients are free to install whatever they wish.
Web Statistics SSL/TLS
 Web Statistics SSL/TLS
This is simply a Plesk control panel link to your domain’s Awstats web statistics page. This is password protected with your FTP user/pass and islocated at:
https://domain.com/plesk-stat/webstat-ssl/
Mail Importing
 Mail Importing
If you store your mail on a server you’ll want to bring it with you when you move to HostNexus. The Plesk control panel has a fantastic Mail Importing tool that is incredibly easy to use. Just enter your mailbox’s username, password and host. Then select an existing mailbox you might have already created or create a new mailbox with the same name right in the options panel. Click OK and go grab a cup of coffee.

Website Importing
 Website Importing
Moving your website(s) to HostNexus is really easy. In the Plesk control panel click on Website Importing, enter your domain name, FTP username and password.

The importer can automatically detect WordPress, Joomla, Drupal, PrestaShop and Magento installations. It will then import all files and databases related to the application.

If you have other files, directories and even other databases they can also be imported. For more information see the Cloning section of our Plesk WordPress Toolkit guide.
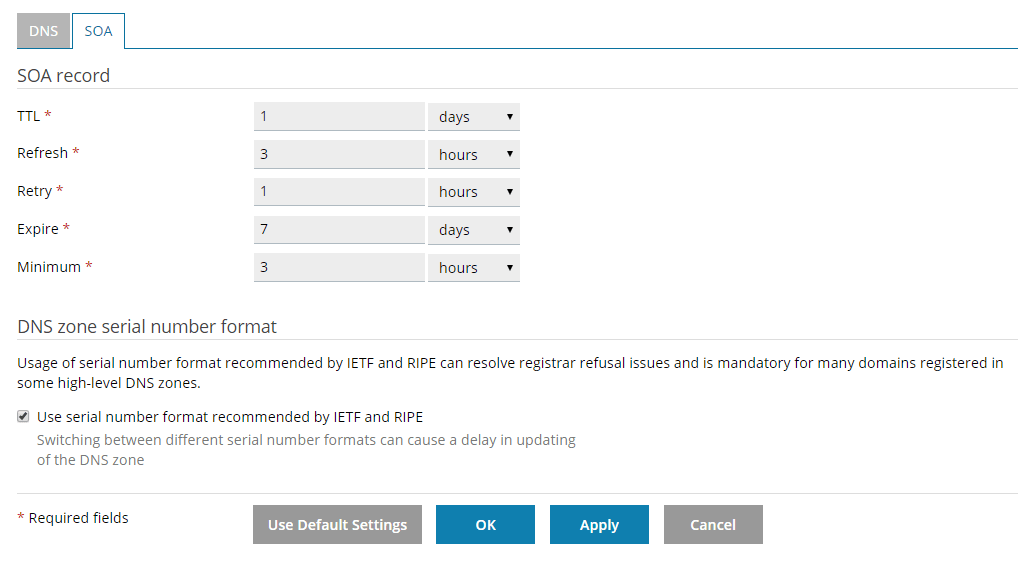
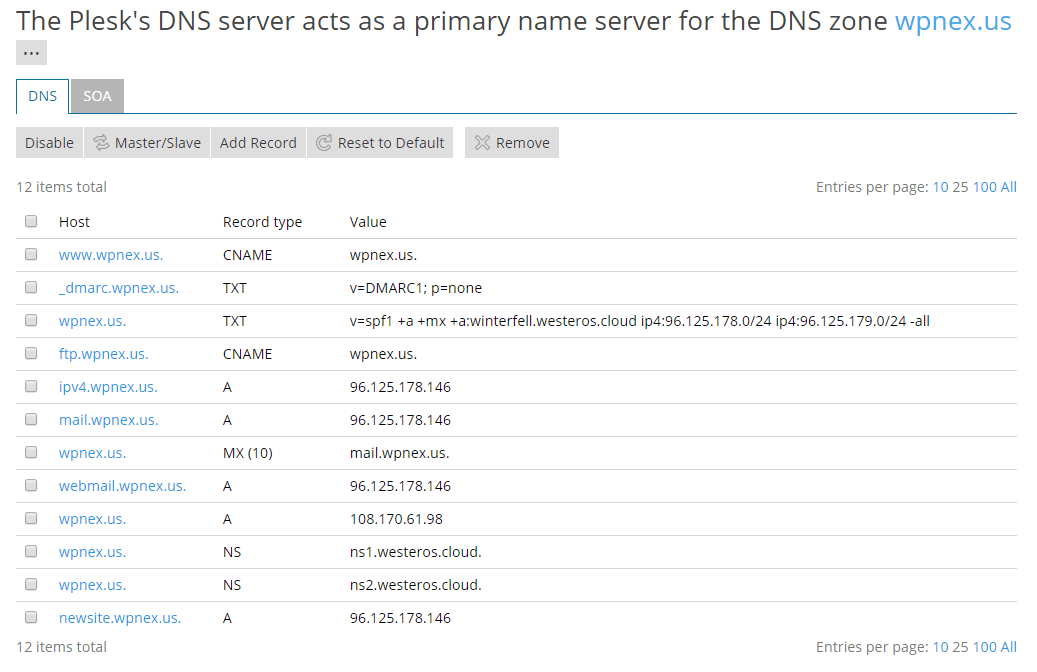
DNS Settings
 DNS Settings
If you have delegated your domain’s DNS to our server (via using our nameservers) you will have full control of your DNS. Add or edit any record and control other settings like TTL under the SOA tab.
Mail Settings
 Mail Settings
The Mai Settings are also accessible from the main Mail section in the Plesk control panel. In here you can toggle your mail service on and off, select your Webmail program (Roundcube or Horde) and set the SSL certificate used for web. But most importantly this is where you activate DKIM which is turned off by default. Please see our DKIM and DMARC tutorial for information on this topic. But you definitely should be activating this.

Every server we deploy is checked with mail-tester.com with DKIM activated. Our tests always return 10/10.
Limit Outgoing Messages
 Limit Outgoing Messages
Our default mail sending limit is 300 per hour. You can set a lower limit than that under Limit Outgoing Messages. Please note you cannot set a higher limit than 300. And setting unlimited will, of course, return an error that you must set lower than 300.

SSL/TLS Certificates
 SSL/TLS Certificates
This is your overall SSL Manager and all certificates will be listed here – even Let’s Encrypt. If you have an SSL certificate from another vendor this is where you will upload it. If your CSR (Certificate Signing Request) was generated on another server and you are migrating together with your SSL certificate you must also have your RSA Key. If buying a new certificate click Add SSL/TLS Certificate and fill out the form. This will generate your CSR. You can also purchase SSL Certificates from HostNexus. Certificates bought from HostNexus need no extra setup. Simply purchase the certificate and paste in a token under AutoInstallSSL (more on that further on in this guide).

Web Application Firewall
 Web Application Firewall
This is a user interface for our first layer Web Appliance Firewall (WAF). There are no configurable options for this in the Plesk control panel – just the ability to turn it off.
Password Protected Directories
 Password Protected Directories
If you need to restrict web access to a particular directory you can set that up under Password Protect Directories. Click Add Protected Directory and add the directory name. If you have /secure inside httpdocs then you will input /secure and NOT /httpdocs/secure. The “Title” field is not required but please add as you see fit.

Once the Protected Directory has been created you need to click on it and add a username and password.


Just like all the error pages, you can edit the 401 error page displayed when a user tries to access the secure directory. You’ll find the error_docs directory alongside httpdocs. The 401 page is called unauthorized.html.
Please note you can also set up password protection via the WordPress Toolkit
Website Copying
 Website Copying
The Website Copying feature in the Plesk control panel is mainly for non-WordPress domains. WordPress users can easily copy their instance to a staging site via the Clone feature in the Plesk WordPress Toolkit. If you don’t run WordPress use Website Copying to copy files to another subscription or subdomain. Unlike the WordPress Clone feature this subdomain will have to be created before you use this tool.

You can also copy your files to a remote FTP location.
Logs
 Logs
LogsThe Plesk control panel contains an an exceptional Log Manager. You can easily filter between the 2 access logs for Apache and Nginx and the Error Logs in the Log Viewer. You can also activate Real-time updates which will allow you to see the logs update in real time. Click on Manage Log Files to see each log file separately and download. Large log files can also be deleted. Log rotation can also be end-user configured to rotate by size or time.

ClusterLogics Backups
 ClusterLogics Backups
You’ll see Backup mentioned twice in Websites & Domains. On the top right you’ll see Backup Manager. These are Plesk backups that you can configure. The ClusterLogics Backup system is our main backup system. All you files are backed up to our ClusterLogics cluster ever day with 14 days total retention. Our clients can select a backup date, select files, choose restore location or download backups. The interface is simple and self-explanatory.
- Select Account – If you have subdomains they’ll be isted separately.
- Select Date Range – You can go back 14 days.
- Select Files or Databases
- Select Job – All backups within your date range will be listed.
- Select files, directories, all files or database.
- Restore To Folder – Choose a new restore location or leave empty to restore to original location.
- Restore or Download.

Google PageSpeed Insights
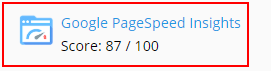 Google PageSpeed Insights
This integrates with the popular Google PageSpeed Insights tool. The output is exactly the same as if you ran the tool from the Google page.
Advisor
 Advisor
The Plesk Advisor is a simple tool that helps you keep track of certain security issues. It will track valid SSL installations, WordPress file security and your PHP version.

Statistics
 Statistics
Under Statistics in the left side menu you can monitor your disk space and traffic usage. Disk space stats will list all types of usage:
- Web files
- Databases
- Logs
- Backups (Plesk backups)
- Configuration Files

Traffic statistics are divided into the services:
- HTTP
- FTP
- POP3/IMAP
- SMTP

Traffic statistics can be further broken down into daily stats by clicking Daily Transfer Statistics. From there click on [View] next to the domain name (subdomains will also be listed) and you’ll see a daily breakdown of traffic across all services.

Users
 Users
UsersUnder Users we can configure and control Plesk control panel access for anyone that may need it. Before you grant access and configure a new user you should familiarize yourself with the 4 default User Roles you’ll find in Plesk. Click User Roles and you’ll see:
- Accountant
- Application User
- Owner
- Webmaster
All of these apart from Owner can be edited with a level of access that you decide. For example:

Decide on a User Role for your new user and when you create this new user select this User Role.

Account
 Account
In the Account section:
- Edit your Profile
- View Resource summary
- View Hosting parameters summary
- View account permissions
Backup Manager
 Backup Manager
At HostNexus we have Multi-Tiered Backups and you should employ a multi-tiered backup policy to ensure you never have to endure the pain of data loss. We have everyone covered with our own ClusterLogics Backup solution as covered above. But we encourage all clients to take their own backups. And we make it incredibly easy for you to configure separate backups in Plesk.
Backups can take up a lot of space and the last thing we want is an account to auto-suspend due to space overuse from backup storage. Therefore we only allow backups to remote storage. If you try and take a backup from the Backup Manager you will see the following error:

So first you’ll need to go into Remote Storage Settings and set your desired method. You can configure a remote FTP account or DropBox. If you have another hosting account elsewhere you make a backup folder there and set your FTP hostname, user and password. The Backup Manager also supports FTP Passive Mode and FTPS (secure FTP connections).

Likewise, you are welcome to use your HostNexus account to backup files from an external hosting account. Just be sure you have enough space available!
An excellent remote storage solution is DropBox. Their free tier allows 2.5gb but you can get 1tb for just $9.95/mo and that would cover a ton of sites. Just click on DropBox and you’ll be taken to a DropBox login page.

You’ll be asked to authorize the server to send data to DropBox. Just click the provided link and you’re done.

Now we have configured our Remote Storage Settings with FTP or DropBox we can schedule a backup. Click on Schedule in the Backup Manager.
- Check Activate this backup task.
- Select the time of day to run your backup.
- If you select Incremental Backup only changed files will be backed up daily.
- Full backups can be performed weekly, monthly or yearly.
- Select backup retention in number of weeks.
- Choose to backup files and database or mail or both.
- Create multivolume backups (handy for large sites with a lot of data).
- Choose to exclude log files and any other files you decide.
- Set email notifications if your backup encounters errors.
For example in the following backup I have set backups to run daily at 3am EST, used incremental backups, do full backups weekly and keep backups for 4 weeks. All data is backed up excluding log files.

Scheduled Tasks
Under Scheduled Tasks you can set cron jobs. To create a scheduled task, go to Websites & Domains > Scheduled Tasks > Add Task. There three types of task you can run:
- Command – Specify the full path to the scriptto be run. Running a PHP script under PHP 7.2 would look like this:
/opt/plesk/php/7.2/bin/php -q /home/httpd/vhosts/yourdomain.com/path/to/cron.php- Fetch a URL. Specify the URL only, there is no need to type the command, such as curl or wget. So in the above example we would just put
https://yourdomain.com/path/to/cron.php- Run a PHP script. Specify the path to the script relative to your virtual host directory. You can click the icon to quickly locate the script file. So in the above example we would enter:
httpdocs/path/to/cron.phpSet a time for the cron to run. This can be Hourly, Daily, Weekly or Monthly.For advanced users you can select Cron style under Run. This is helpful if you need to execute a script more often. For example to run a cron every 10 minutes you would enter:
*/10 * * * *If you need to set up a cron that executes at certain times you can do something like:
7-11 * * * *That instructs the cron to run at hours 7, 8, 9 and 10 every day. If you need help in setting up a cron job that runs at odd times during the day please don’t hesitate to contact us.
Outgoing Mail Control
Under Outgoing Mail Control you can see if Plesk has detected unusual mail activity from your domain. If a mailbox has been hacked (due to a weak password) and mail is being sent over our threshold of 300 per hour it will be listed here. If a script has been compromised and is sending mail it will just list your domain and the amount of mail being sent. These outgoing mails will be scrubbed by SpamExperts.

AutoInstallSSL
 AutoInstallSSL
If you buy a commercial SSL Certificates from HostNexus you can install it with just a few clicks. No more do you have to create a Certificate Signing Request (CSR) and paste it into a certificate order process. When you buy an SSL certificate from us you get a special token. In the Plesk control panel go to AutoInstallSSL and enter your token.

You will then be taken to a page where you fill out some details (name, address, email address etc) and then AutoInstallSSL does its magic. It connects to the SSL vendor, downloads your certificate files and then installs it into the Plesk control panel.

CloudFlare
 CloudFlare
Set up your domain with CloudFlare with just a few clicks. CloudFlare puts your domain’s assets on a CDN thereby increasing domain performance for your visitors. With our integration you get CloudFlare’s Railgun service for free. To get the most out of CloudFlare and Railgun please read our CloudFlare tutorial.
Secure Plesk Control Panel Access With Google Authenticator
 Secure Plesk Control Panel Access With Google Authenticator
You can add an additional security layer to your Plesk login by enabling Google Multi-factor Authentication. Enable the service, scan the code and enter your verification code. All set.

And when you login you’ll be prompted to add a verification code from the Authenticator app on your mobile device.

If you ever lose your phone we can disable this fr you so you can recover Plesk access.
Resource Usage
Our servers use LVE container technology to assign resource limits to domain. The container technology also isolates each domain’s filesystem to strengthen overall security. As our servers are cloud based we have an almost limitless supply of CPU and Memory that can be assigned to servers as they need it. This together with the insanely high resource limits we allocate to each container lays the foundation for a robust hosting framework that can sustain thousands of concurrent visitors. In the Plesk control panel there is a Resource Usage section where you can monitor exactly that – your domain’s CPU and Memory usage as well as total processes and connections and your impact on drive speed (IO). The server will also email you an alert if you hit a limit. Feel free to contact us if you believe you are hitting your upper limits. We can assist you in analyzing your site’s performance and propose a solution.

Imunify360
Imunify360 is one of the most sophisticated server security systems ever built. It uses artificial intelligence and herd immunity to block attacks, filters out all bot traffic and stops malware before it can infect your website. If malware does get through it automatically scans file systems for malware injection and quarantines infected files. This software is being continually developed and more data is being added to the end-user dashboard all the time. As of Q3 2018 end-users in the Plesk control panel can access the Imunify360 Malware Scanner and view quarantined files.

SpamExperts
 SpamExperts
Your email is protected by our enterprise level spam filter called SpamExperts. The link in Plesk will take you to the SpamExperts dashboard. Learn how to manage your email with SpamExperts in this tutorial.

Add Comment